Last updated on February 4th, 2021 at 01:07 am
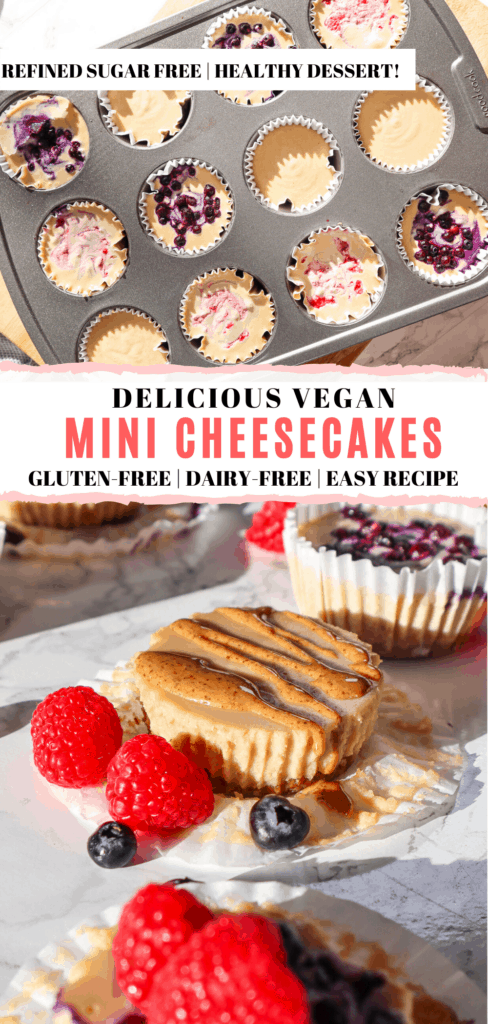
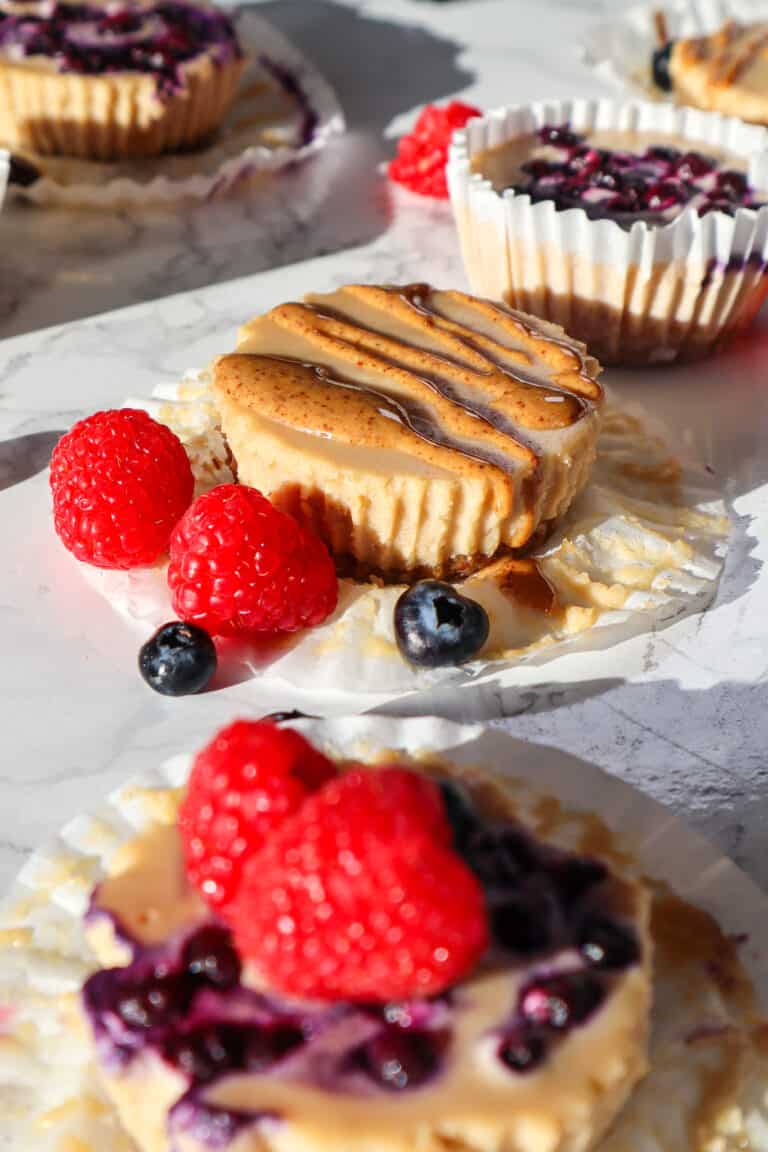
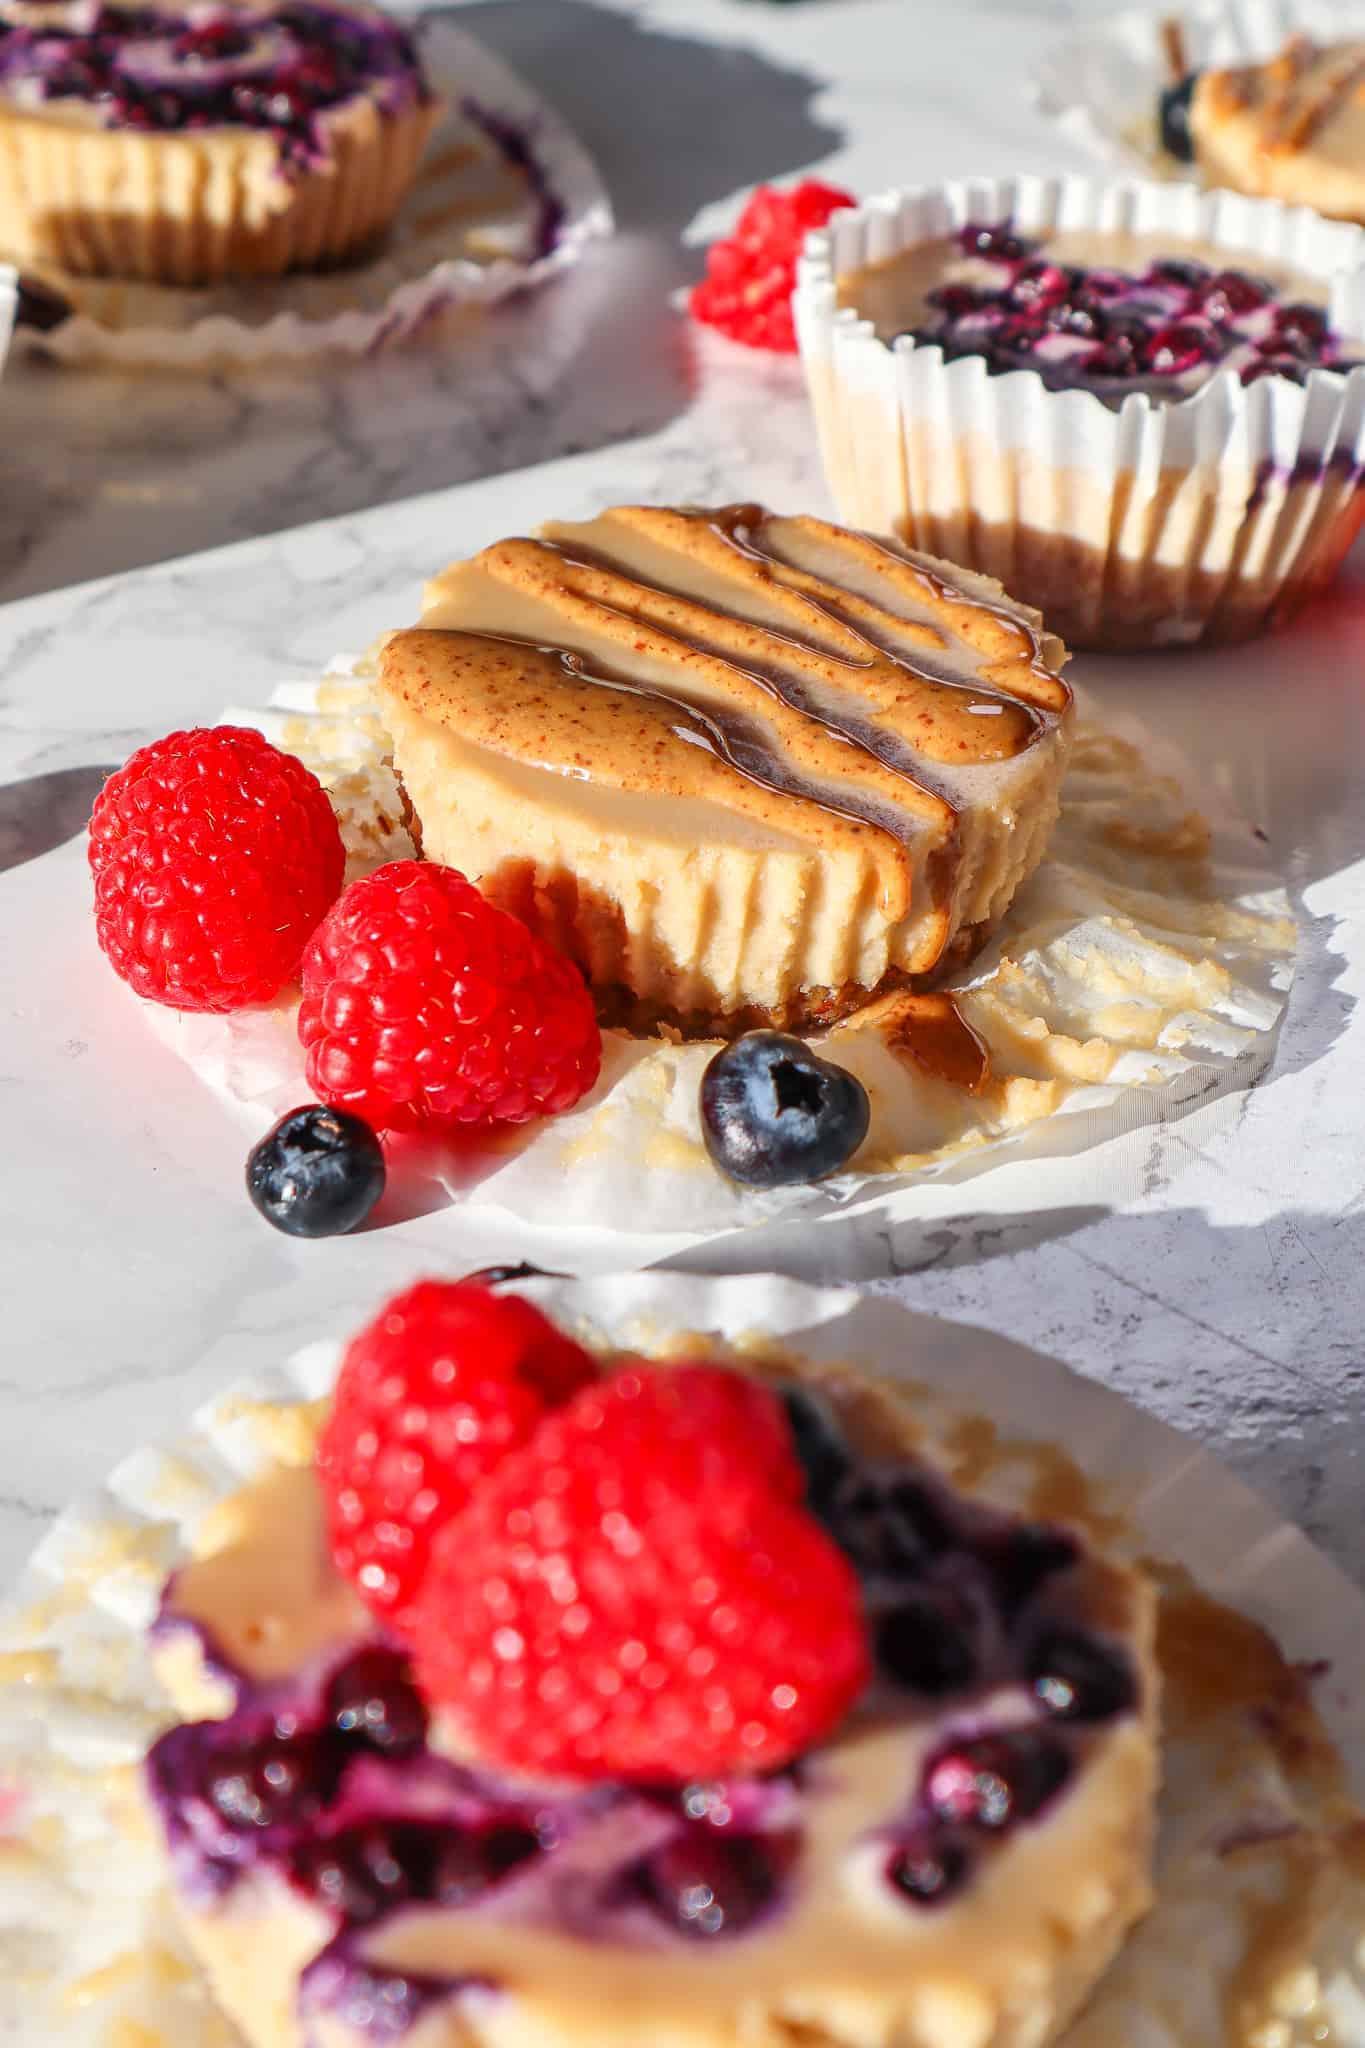
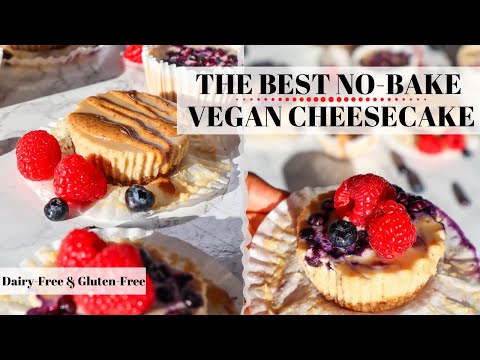
Say hello to the best Cheesecake Recipe that you’ll ever make! These Delicious Vegan Mini No-bake Cheesecakes are easy to make, involving just a few simple ingredients! Enjoy a healthy, sweet cheesecake dessert without the dairy, egg, processed sugars, or gluten!
If you’re a fan of no-bake vegan cheesecakes, you’ll definitely want to try my No-Bake Blueberry Cheesecake and my No-Bake Pumpkin Swirl Cheesecake!
I have to start off by saying that when I say this is the BEST cheesecake you’ll ever have, it is not an overstatement, an exaggeration, or a misuse of words. This no-bake vegan cheesecake recipe is absolutely incredible!
The reasons I can say that so confidently that this cheesecake is the best are:
1. Prior to my dairy-free days, I made unbelievably good cheesecake using cream cheese and it was my most requested dessert for any gathering that I would attend; literally my friends would beg me to make it!
2. Because I am now dairy-free, I pride myself on developing the best non-dairy desserts that taste BETTER than the traditional dairy-included way. And this recipe does not disappoint! (I actually think it tastes WAY BETTER than the traditional cheesecakes which use cream cheese and all other sorts of refined sugars and cream.)
So, let’s jump into it How to Make this No-Bake Vegan Cheesecake!
And don’t worry, this recipe is very easy! All you need is a blender and a refrigerator 🙂
The Best Vegan Cheesecakes!
How to make the crust for the cheesecake
THE CRUST IS MADE WITH 2 SIMPLE INGREDIENTS: DATES AND AMOND MEAL.
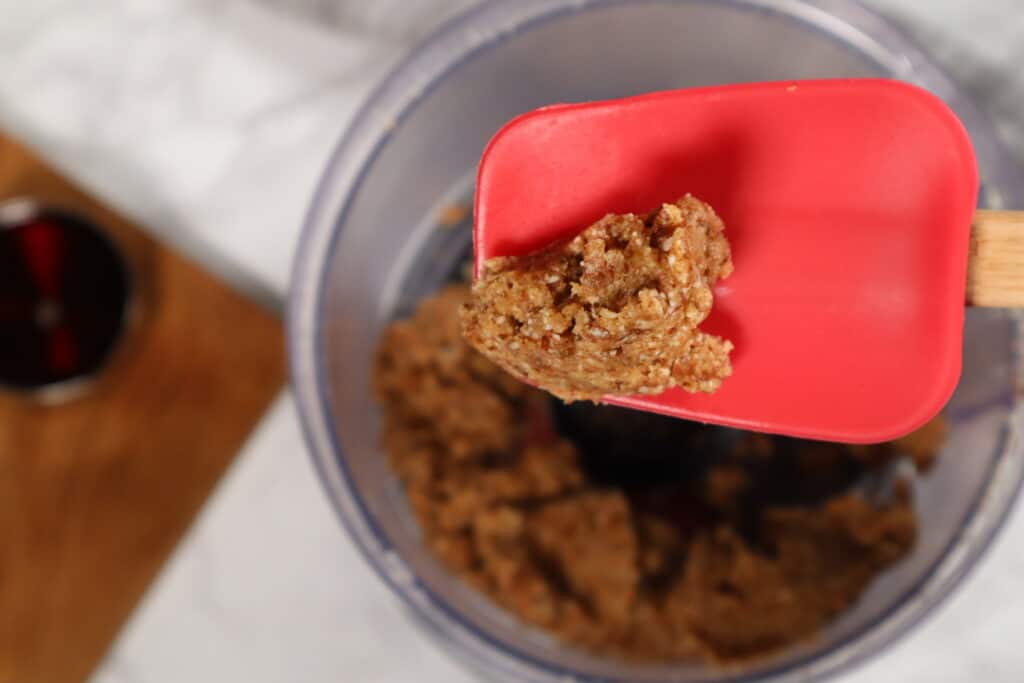
Dates: Dates are considered natures candy. They are tasty, sweet, and perfect for this recipe because when blended they get very sticky. Dates are also nutrient-rich and provide tons of antioxidants, fiber, calcium, and more! (Be sure to remove the pits when blending)
Almond Meal: is simply ground almonds. You can blend almonds yourself in a high powered blender to create the almond meal, or you can find almond meal readily available at the grocery store. My favorite almond meal brand is Trader Joe’s Just Almond Meal. (Almond meal and almond flour are different as almond flour has been blanched and ground into a flour. Be sure to use Almond Meal)
Simply blend the dates and almond meal together until it forms a sticky chunky consistency. If the mixture is too dry, add 1-2 more dates. Then, take about 1-2 tablespoons of the mixture and transfer the mixture to a parchment-lined muffin tin. (The parchment paper makes the cheesecakes easy to remove when they are ready to enjoy)
An easy trick to smooth the crust along the bottom of the muffin tin is to take a small glass, line it with parchment paper at the bottom and press the glass into the opening until the crust is smooth.
How to make the creamy cheesecake filling
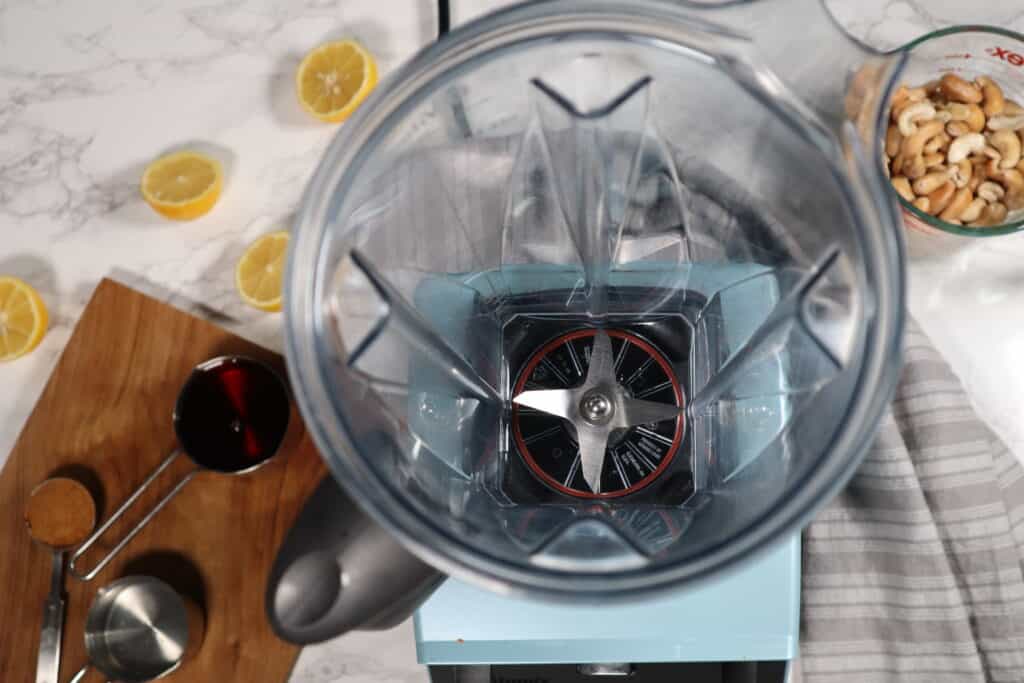
For the Filling, you need 7 simple ingredients!
-
Cashews, soaked: Soaking the cashews allows them to create a smooth, rich cream when blended. First, boil 2 cups of purified water. Once the water is hot, pour the water over the cashews and allow the cashews to soak for at least 15 minutes. The longer the better, but 15 is sufficient. I usually soak my cashews for at least 1 hr.
-
Coconut Cream: To get coconut cream, all you have to do is put a can of full fat coconut cream into the fridge for at least 1 hr. (I usually keep a can in the fridge so I have some coconut cream handy whenI need it.) Then, remove the solidified top portion, this is the coconut cream, and leave behind the liquid.
-
Agave Nector + Maple syrup: You can use only maple syrup and omit the agave. Simply double the amount of maple syrup, but I like using both because they each provide their own distinct taste which comes together magically in this cheesecake recipe.
-
Coconut Oil: Make sure to melt the coconut oil first.
-
Coconut Sugar: is a natural sugar made from palm sap. It has a sweet, almost caramel taste. I love the way it enhances this recipe. A good coconut sugar brand is Trader Joes Organic Coconut Sugar.
-
Vanilla Extract: Because, of course! 🙂 The vanilla is subtle but helps balance the flavors.
-
Lemon: Juice 1 Fresh lemon. It adds just the perfect amount of zest to the recipe!
Simply blend all of these ingredients together for about 2-3 minutes until you achieve a silky, luscious cream.
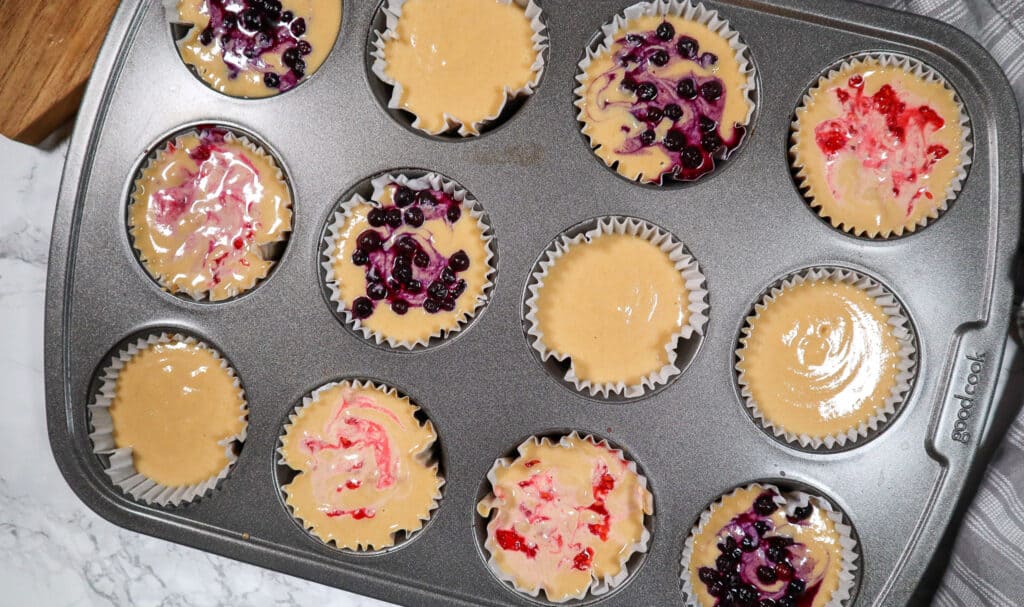
Cheesecake add-ins
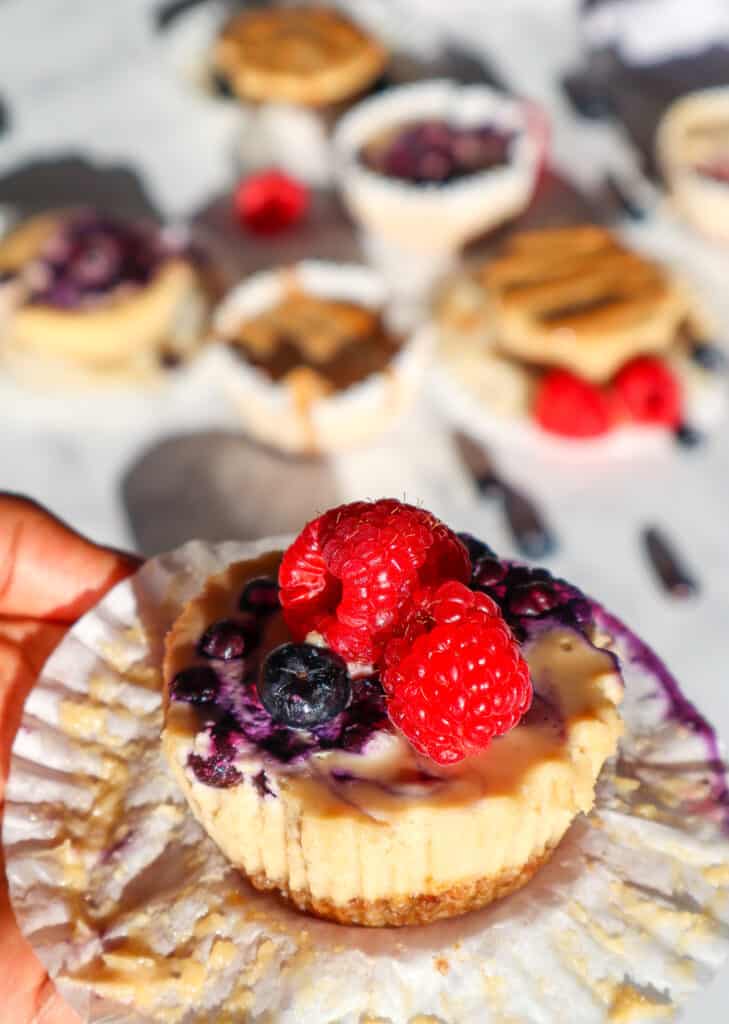
I use frozen wild blueberries, fresh muddled raspberries, and top the cheesecakes with almond butter. You can also try these options:
-
Adding 2-3 tbsp of peanut butter to the filling during the blending process. This will make peanut butter cheesecakes (YUM!)
-
Add crushed Oreos to the mix after it is blended. While Oreos are not gluten-free, they are vegan!
-
Chocolate chips: In the mix or on top
-
Caramel
- White Chocolate
You’ll love these No-Bake Vegan cheesecakes. they are:
-
Creamy
-
Rich
-
The Perfect level of sweetness
-
Incredibly Delicious
-
Healthy-ish Dessert
-
Less than 300 Calories
-
5 grams of Protein per cheesecake
Tips:
-
Allow the cheesecakes to set for at least 2 hours in the freezer. When you are ready to eat the cheesecake simply remove them from the freezer. You can eat them straight out of the freezer, or allow them to thaw for 10-15 minutes before enjoying. Both ways are delicious!
-
These cheesecakes keep perfect in the freezer! You can make a batch and store them in the freezer for up to 2 weeks, enjoying them as you like!
-
Try them with coconut whipped cream on top! This one is my favorite.
Delicious No-Bake Vegan Mini Cheesecakes
Equipment
- Blender or Food Processor
- Muffin Tin
- Parchment Paper
Ingredients
Crust
- 1 1/2 cup Pitted Dates
- 1 cup Almond Meal
- 1/4 tsp Sea Salt
Cheesecake Filling
- 1 1/2 cup Cashews, soaked*
- 1 cup Coconut Cream
- 1/4 cup Agave Nectar
- 1/4 cup Maple Syrup
- 1/3 cup Coconut Oil, melted
- 2 tbsp Coconut Sugar
- 1 tsp Vanilla Extract
- 1 Lemon, juiced
Optional Toppings
- 1/4 cup Almond Butter
- 1/3 cup Frozen Blueberries
- 1/3 cup Muddled Raspberries
Instructions
- In a medium saucepan, boil 2 cups of water. Place the cashews in a medium sided bowl. Once the water is boiling, pour the water over the cashews and soak the cashews for at least 15 minutes and set aside. When the cashews are ready to use, be sure to pour out the water.
- In a Food Processor with an S shaped blade, or blender, blend the dates and almond meal together until it forms a sticky chunky consistency. If the mixture is too dry, add 1-2 more dates.
- Take about 1-2 tablespoons of the mixture and transfer the mixture to a parchment-lined muffin tin. (The parchment paper makes the cheesecakes easy to remove when they are ready to enjoy). An easy trick to smooth the crust along the bottom of the muffin tin is to take a small glass, line it with parchment paper at the bottom and press the glass into the opening until the crust is smooth. Place the muffin tin into the fridge until later.
- In the blender, combine all of the cheesecake filling ingredients and blend until smooth, at least 2-3 minutes. (If you are adding peanut butter, now is the time to blend it in with the ingredients)
- Remove the muffin tin with the crust from the fridge. Pour the cheesecake filling into the muffin tin openings.
- Next, add your favorite toppings. Then, cover the muffin tin with plastic wrap and put into the freezer and allow the cheesecakes to set for at least 2 hours.
- After at least 2 hours, simply remove the cheesecakes from the freezer. Let the cheesecake sit out at room temperature for 20 minutes for the optimal texture. Top with your favorite fresh fruit, chocolate, or whipped cream, and Enjoy!
Video
Notes
- Allow the cheesecake to set for at least 2 hours in the freezer. When you are ready to eat the cheesecake simply remove them from the freezer. You can eat the cheesecake straight out of the freezer, or allow it to soften at room temperature for 15-20 minutes before enjoying it. Both ways are delicious!
- You can keep any leftover cheesecake (covered) in the fridge for up to 3 days. The texture will be soft and luscious. If you do not plan to eat the cheesecake within 3 days, keep the cheesecake in the freezer until you are ready to enjoy it!
- This cheesecake keeps perfect in the freezer! You can make it and store it in the freezer for up to 2 weeks, enjoying a slice as you like!
- Try the cheesecake with coconut whipped cream on top! This one is my favorite.

33 Comments